Create and use your first component in Blazor!
Blazor, the new client-side UI framework from the ASP.NET team, is definitely making a splash among the developers that were trying to avoid the JavaScript coding experience (or even better the debugging JavaScript experience!).
JavaScript flavors ruled successfully the frontend world for so long, that this loved and hated language start infiltrating the backend world with Node.js. Strongly-typed languages fought back, and ASP.NET was the first to introduce a solution: Blazor, an attempt to bring strongly typed C# to the frontend, a breath of fresh air for all strongly-typed language lovers!
In case you like code more than words, visit the WeatherWidget component’s source code in Github.
What is a component in Blazor?
Blazor applications are created using components which are flexible, lightweight, and can be nested, reused, and shared between projects. Components then, are self-contained chunk of user interface (UI), such as a page, dialog, or form.
New to Blazor? That’s a very easy tutorial to get started with: https://dotnet.microsoft.com/learn/aspnet/blazor-tutorial/intro.
Blazor apps are built using Razor components which can contain any combination of Razor, HTML and C# code.
At the end, components are classes like the following, that include both the HTML markup to render along with the processing logic needed to inject data or respond to UI events:
<p>Current count: @currentCount</p>

<button class="btn btn-primary" onclick="@IncrementCount">Click me</button>

@code {
    int currentCount = 0;

    void IncrementCount()
    {
        currentCount++;
    }
}
Assuming prior knowledge on how to create a Blazor Server app, lets jump start directly into the component creation with a step by step guide.
Step 1. Getting started – An oversimplified component
As we ‘ve seen already, a Blazor component is nothing more than a file that contains both HTML markup and the equivalent logic, which makes it rather intuitive on how to to create one; just create a new file with .razor as extension and throw in some logic, for example the code from above.
The following image illustrates exactly that:
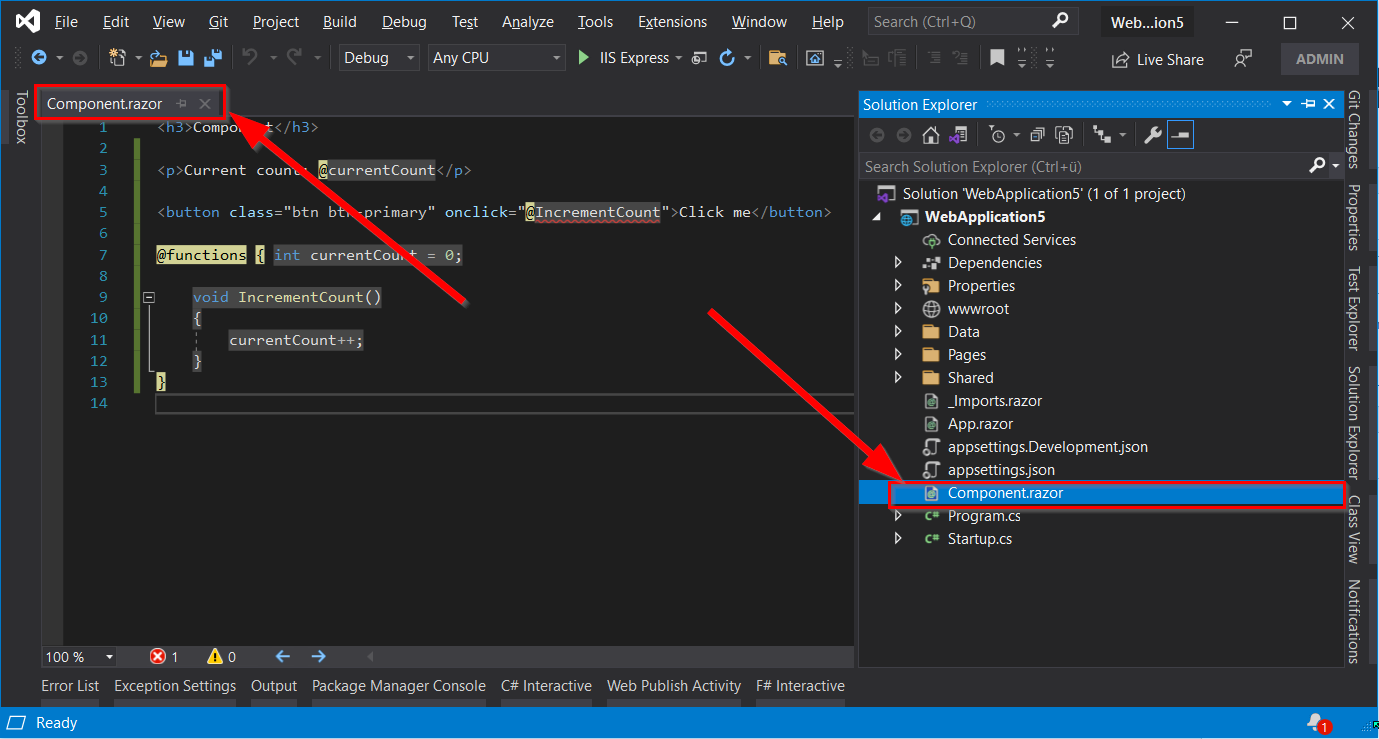
This oversimplified approach with the rather useless counter is good enough to underline the simplicity of creating a component. They are nothing more than an attempt to isolated code that we would write in any usual razor page. After all, Blazor is nothing more than a rendered tree of components.
As a next step, let’s try to create something more complicated that could potentially be useful for others, like for example a weather component that we will name WeatherWidget.
The requirements for our new component will be the following:
- Pull live data from an online weather service
- Reuse it in multiple projects (e.g. as a nuget package or as an assembly reference)
- Allow end user to change city on demand
- Feature a default template but allow also custom user templates
Let’s go!
Step 2. Creating an assembly for our component
Since we want to reuse our component, and potentially create a Nuget package out of it, we need a different assembly for our code. The first step that actually creates that assembly is rather easy since Visual Studio templates are there for us. Let’s start a new instance of Visual Studio, create a new project and select Razor Class Library for the template, as illustrated in the following image.
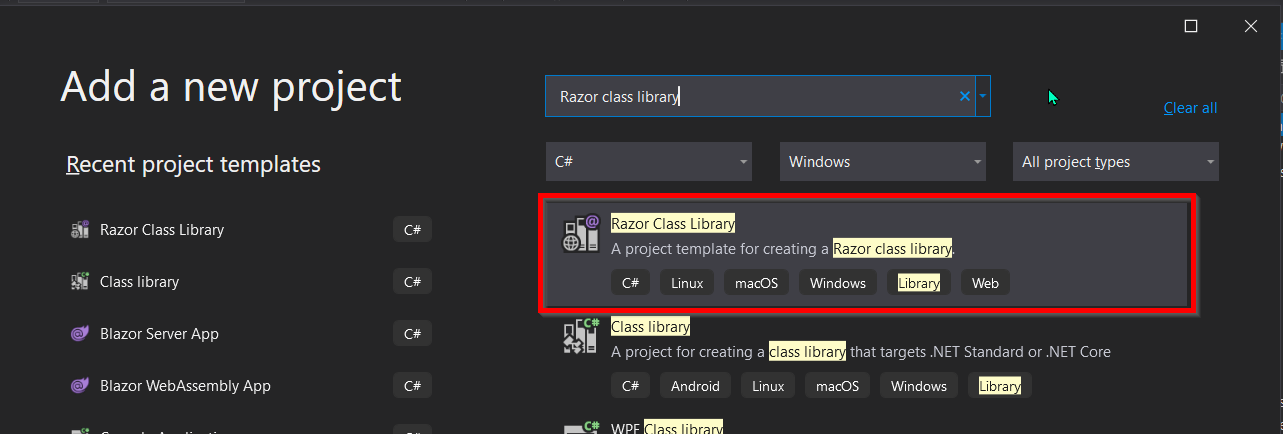
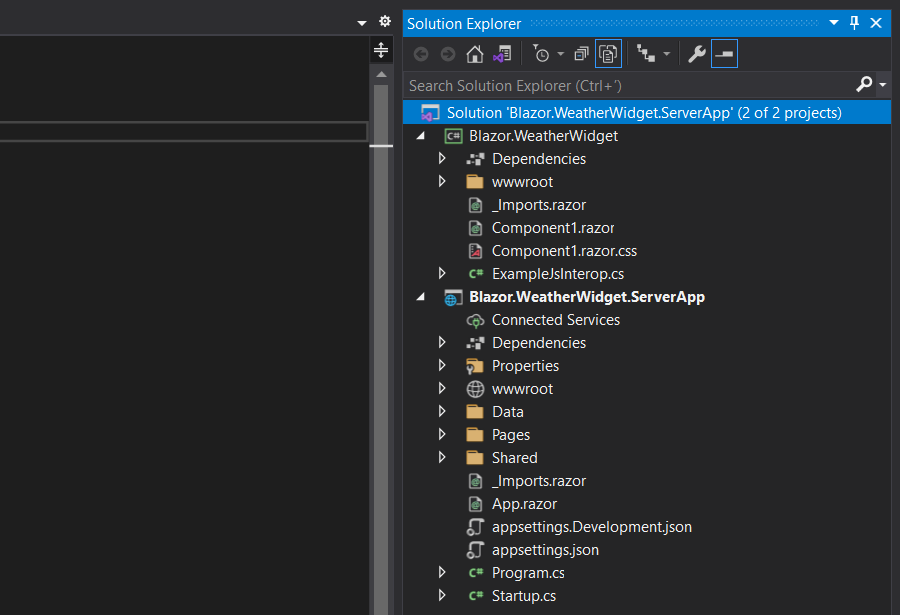
What we will get after following the wizard is a working component and with it an example on how JavaScript functionality can be wrapped in a .NET class for easy consumption – something that we will not need here but its a nice future topic. Creating a Blazor Server app is not part of this guide but components cannot run on their own! Let’s also add a Blazor App by right clicking on our solution, selecting New Project and then a Blazor Server App to end up with this in your visual studio:
When doing cross-origin requests, the remote endpoint must enable cross-origin resource sharing (CORS). Up until now, OpenWeatherMap hasn’t done so, so the component we are building can only be available for server-side apps.
Finally, we need to add a project reference of the library to our new App and a using statement. We do that with the old and classic “Add a project reference” way, and then by adding a @using WeatherWidget statement in the razor page we wish to render the current weather (for this post, it’s Pages/Index.razor):
@page "/"

<!-- Add a using to locate the component -->
@using  Blazor.WeatherWidget

<!-- Add the component -->
<Component1 />

<h1>Hello, world!</h1>

Welcome to your new app.

<SurveyPrompt Title="How is Blazor working for you?" />
If everything worked and we run our app, we should see the following:
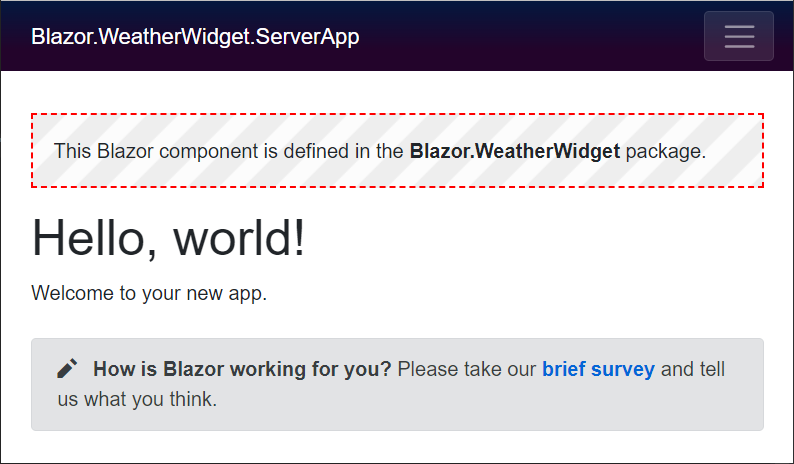
Take really good care of your namespaces and folders, they need to match! Also find a unique namespace for your component that is not included in your main project. For example don’t use
WeatherWidgetas a namespace for your component andSomething.WeatherWidget.SampleAppfor your sample app, they need either differ completely or to have the same start, e.g.Blazor.WeatherWidgetandBlazor.WeatherWidget.SampleApp. Namespace problems are the worst in Blazor since the errors produced by Visual Studio are irrelevant and misleading. Check for example this issue: https://github.com/dotnet/aspnetcore/issues/13090
Now that we have a skeleton running, let’s move away from Blazor for a 2-3 steps and implement our weather service (I know it’s sad but we have too!).
Step 3. Requesting weather data
There are of course many online services to retrieve weather data from, so feel free to choose whichever you want. I chose Open Weather Map just because I found their API to be really easy to use and additionally they offer 1M free calls per month – more than enough to develop and test this thing!
First things first, in order to get your 1 million free requests your need to have an account! Visit https://home.openweathermap.org/users/sign_up and complete the sign up process. When you validate your email, return to the Open Weather Map, login and navigate to the “My API Keys” screen as seen below:
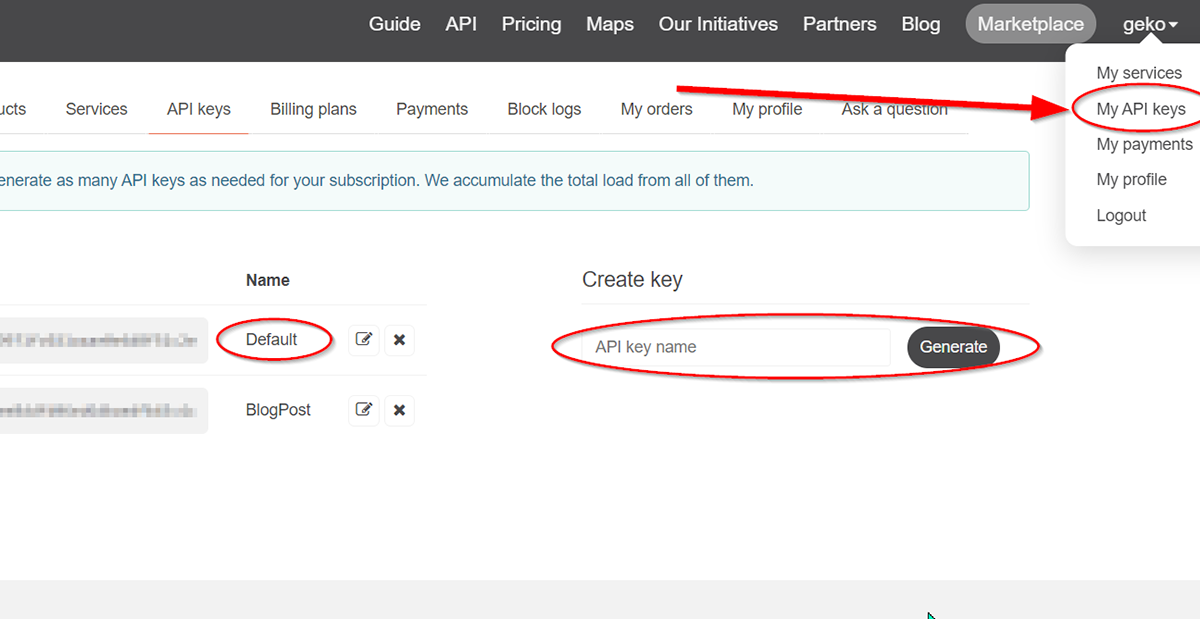
When you land in this screen you will already see a default key. This works immediately but it is usually suggested to create a new key per usage and never reuse the same everywhere.
Worth noting here, that you will have to wait a couple of hours until the key is ready. This is something that Open Weather Maps needs to workout; eventual consistency is one thing but two hours delay is kind of a deal breaker… I only knew…
Step 3. Creating the models
When you are ready and you key is working you can start retrieving raw data. To do so, use the GET endpoint which you can query with your key and the location you are interested in. The following, for example, is for Munich, DE:
GET https://api.openweathermap.org/data/2.5/weather?q=Munich,DE&APPID=xxxxxxxxxxxxxxxxxxxxxxx
The request above returns data in a JSON format which is easily readable and self-explanatory. The sample following contains weather data for Munich, Germany for July 7th, 2021:
{
  "coord": {
    "lon": 11.5755,
    "lat": 48.1374
  },
  "weather": [
    {
      "id": 803,
      "main": "Clouds",
      "description": "broken clouds",
      "icon": "04d"
    }
  ],
  "base": "stations",
  "main": {
    "temp": 291.89,
    "feels_like": 291.49,
    "temp_min": 289.13,
    "temp_max": 293.5,
    "pressure": 1020,
    "humidity": 64
  },
  "visibility": 10000,
  "wind": {
    "speed": 0.89,
    "deg": 168,
    "gust": 3.13
  },
  "clouds": {
    "all": 77
  },
  "dt": 1625219902,
  "sys": {
    "type": 2,
    "id": 2002112,
    "country": "DE",
    "sunrise": 1625195889,
    "sunset": 1625253422
  },
  "timezone": 7200,
  "id": 2867714,
  "name": "Munich",
  "cod": 200
}
Having the schema, we can easily create our models with https://json2csharp.com/. Simply copy the entire JSON returned, paste it in the JSON field and click Convert to get the following result:
// Root myDeserializedClass = JsonConvert.DeserializeObject<Root>(myJsonResponse);
    public class Coord
    {
        [JsonProperty("lon")]
        public double Lon { get; set; }

        [JsonProperty("lat")]
        public double Lat { get; set; }
    }

    public class Weather
    {
        [JsonProperty("id")]
        public int Id { get; set; }

        [JsonProperty("main")]
        public string Main { get; set; }

        [JsonProperty("description")]
        public string Description { get; set; }

        [JsonProperty("icon")]
        public string Icon { get; set; }
    }

    public class Main
    {
        [JsonProperty("temp")]
        public double Temp { get; set; }

        [JsonProperty("feels_like")]
        public double FeelsLike { get; set; }

        [JsonProperty("temp_min")]
        public double TempMin { get; set; }

        [JsonProperty("temp_max")]
        public double TempMax { get; set; }

        [JsonProperty("pressure")]
        public int Pressure { get; set; }

        [JsonProperty("humidity")]
        public int Humidity { get; set; }
    }

    public class Wind
    {
        [JsonProperty("speed")]
        public double Speed { get; set; }

        [JsonProperty("deg")]
        public int Deg { get; set; }

        [JsonProperty("gust")]
        public double Gust { get; set; }
    }

    public class Clouds
    {
        [JsonProperty("all")]
        public int All { get; set; }
    }

    public class Sys
    {
        [JsonProperty("type")]
        public int Type { get; set; }

        [JsonProperty("id")]
        public int Id { get; set; }

        [JsonProperty("country")]
        public string Country { get; set; }

        [JsonProperty("sunrise")]
        public int Sunrise { get; set; }

        [JsonProperty("sunset")]
        public int Sunset { get; set; }
    }

    public class Root
    {
        [JsonProperty("coord")]
        public Coord Coord { get; set; }

        [JsonProperty("weather")]
        public List<Weather> Weather { get; set; }

        [JsonProperty("base")]
        public string Base { get; set; }

        [JsonProperty("main")]
        public Main Main { get; set; }

        [JsonProperty("visibility")]
        public int Visibility { get; set; }

        [JsonProperty("wind")]
        public Wind Wind { get; set; }

        [JsonProperty("clouds")]
        public Clouds Clouds { get; set; }

        [JsonProperty("dt")]
        public int Dt { get; set; }

        [JsonProperty("sys")]
        public Sys Sys { get; set; }

        [JsonProperty("timezone")]
        public int Timezone { get; set; }

        [JsonProperty("id")]
        public int Id { get; set; }

        [JsonProperty("name")]
        public string Name { get; set; }

        [JsonProperty("cod")]
        public int Cod { get; set; }
    }
Easy right? Copy-pasting again will fit them nicely in our solution:
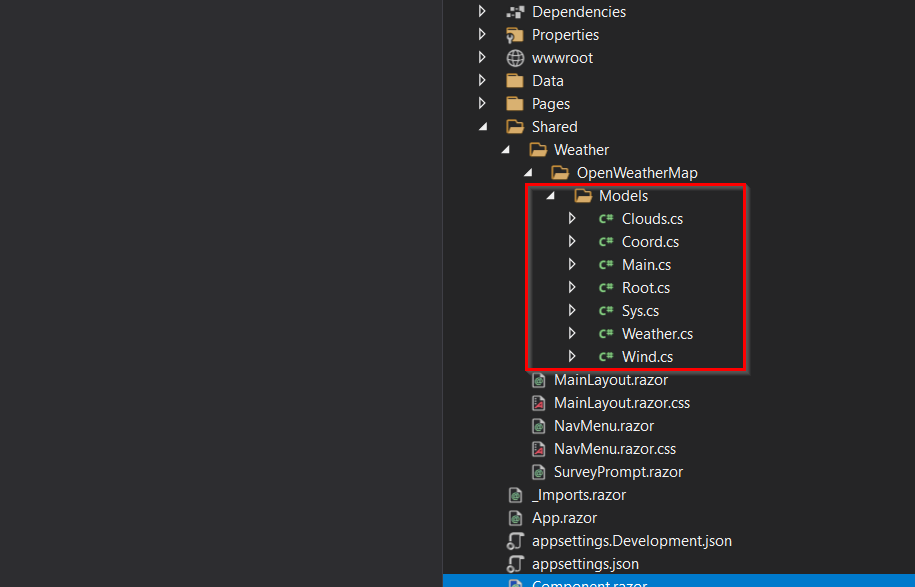
You can also convert JSON to classes from within Visual Studio by first copying the JSON and going to
Edit->Paste Special->Paste JSON as classes
Read more about ASP.NET Core Blazor project structure
Step 4. Creating a service to pull data
This guide assumes prior knowledge in .NET, so we are going to fly through some steps without any details.
First of all, lets add a new class in our project named WeatherService.cs (I like my classes neatly belonging to self-explanatory namespaces, so I also added a Services folder). Once we have that ready, copy-paste the following code in it:
public class WeatherService
{
    private readonly HttpClient _httpClient;

    public WeatherService(HttpClient httpClient)
    {
        _httpClient = httpClient;
    }

    public async Task<Root> Get(string query, string key)
    {
        var request = new HttpRequestMessage(HttpMethod.Get, $"http://api.openweathermap.org/data/2.5/weather?q={query}&APPID={key}");

        request.Headers.Add("User-Agent", "Blazor-Weather-Sample");
        request.Headers.Add("X-Code-Source", "https://github.com/georgekosmidis/Blazor.WeatherWidget");

        var response = await _httpClient.SendAsync(request);

        var result = new Root();
        if (response.IsSuccessStatusCode)
        {
            var responseString = await response.Content.ReadAsStringAsync();
            result = JsonConvert.DeserializeObject<Root>(responseString);
        }

        return result;
    }
}
Last but not least, lets add the IHttpClientFactory and related services to the service container and configure the binding between the WeatherService type and a named HttpClient:
public class Startup
{
        public Startup(IConfiguration configuration)
        {
            Configuration = configuration;
        }

        //...

        public void ConfigureServices(IServiceCollection services)
        {
            services.AddRazorPages();
            services.AddServerSideBlazor();

            //Adds an IHttpClientFactory and all related services
            //   and configures the bindings between the WeatherService
            //   and a named HttpClient
            services.AddHttpClient<WeatherService>()
                    //Sets the time that the HttpMessageHandler can be reused
                    .SetHandlerLifetime(TimeSpan.FromMinutes(5));
        }

        //...

}
It’s bad practice to instantiate an
HttpClientwithin your code even if you dispose the instance later. Read this for more: https://docs.microsoft.com/en-us/aspnet/core/fundamentals/http-requests?view=aspnetcore-5.0
Step 5. Consuming the service
Blazor, being a tree of Razor components, supports C# and uses the @ symbol to transition from HTML to C#. Blazor evaluates C# expressions and renders them in the HTML output. Similarly enough, a code block starts again with the @ character and is enclosed by {} but unlike expressions, C# code inside code blocks is not rendered. The default language in a code block is C#, but we can transit back to HTML which will then be rendered as HTML. Writing within a code block is like writing within a Class, the same rules apply, because everything you include in it will be part a generated class named [COMPONENT_NAME].razor.g.cs. This generated class will be your friend, since most of syntax or parsing errors VS produces point pointlessly to a line withine that class.
Razor is a templating engine that combines C# with HTML to build dynamic web content. Blazor is a component-based, single-page app framework for building client-side web apps using .NET that works well with all modern browsers via WebAssembly for client-side Blazor or WebSockets for server-side.
The following sample puts all of the above together, including injecting the weather service (and the necessary using), consuming it and then outputting the temperature:
@using Blazor.WeatherWidget.Services;
@using Blazor.WeatherWidget.Models;
@inject IWeatherService service;

<div>@Math.Round(result.Main.Temperature, 1) °C</div>

@code {
    private Root result;
    protected override async Task OnInitializedAsync()
    {
        result = await service.Get("Munich, DE", "XXXXXXXXXXXXXXXXXXXXXXX");
    }
}
And it would work just fine if it wasn’t for line 5: <div>@Math.Round(result.Main.Temperature, 1) °C</div>. Remember that expressions are rendered but code blocks not? Well that’s the problem! This line will throw System.NullReferenceException because at the moment of rendering the result property is null. The way around it is too easy to forget and has a live effect for the viewer:
@using Blazor.WeatherWidget.Services;
@using Blazor.WeatherWidget.Models;
@inject IWeatherService service;

@if (result == null)
{
    <p><em>Loading...</em></p>
}
else
{
    <div>@Math.Round(result.Main.Temperature, 1) °C</div>
}

@code {
    private Root result;
    protected override async Task OnInitializedAsync()
    {
        result = await service.Get("Munich, DE", "XXXXXXXXXXXXXXXXXXXXXXX");
    }
}
Which will produce the following result:
Visual Studio, OpenWeatherMap, Models 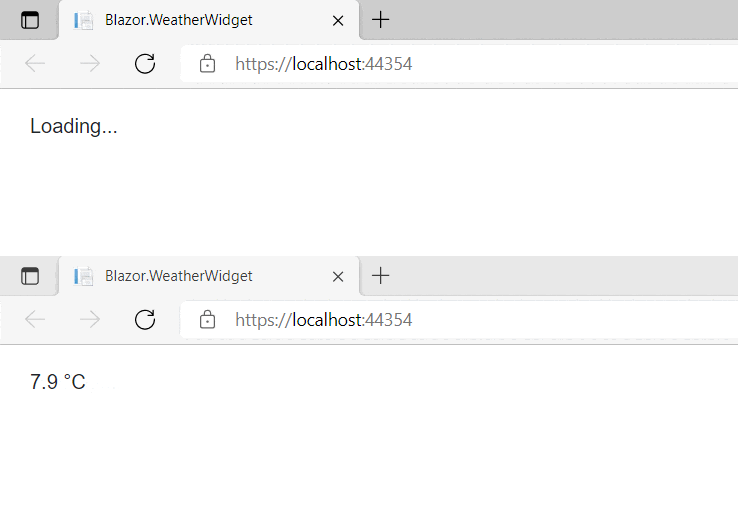
From now on its downhill for a nice looking component, which can include as many properties as the component developer wishes; for this post though we will leave it here.
If you want to get a taste of what it can look like visit https://blazor-weatherwidget.azurewebsites.net/ or check my bootstrap approach here: https://github.com/georgekosmidis/Blazor.WeatherWidget/blob/main/Blazor.WeatherWidget/WeatherWidget.razor
Step 6. Allow end users to change the city
Components in Blazor support -as expected!- form fields. These fields are isolated from the rest of the app so they can be used to interact with the parent (owner) component only which translates to the amazing “part of the screen will update without a page refresh“. This is truly something to achieve by just writing C# and not taking care of events, SignalR, WebSockets, long polling, nothing! You practically do nothing but changing a C# variable value and that reflects to the UI immediately – There’s magic under the hood.
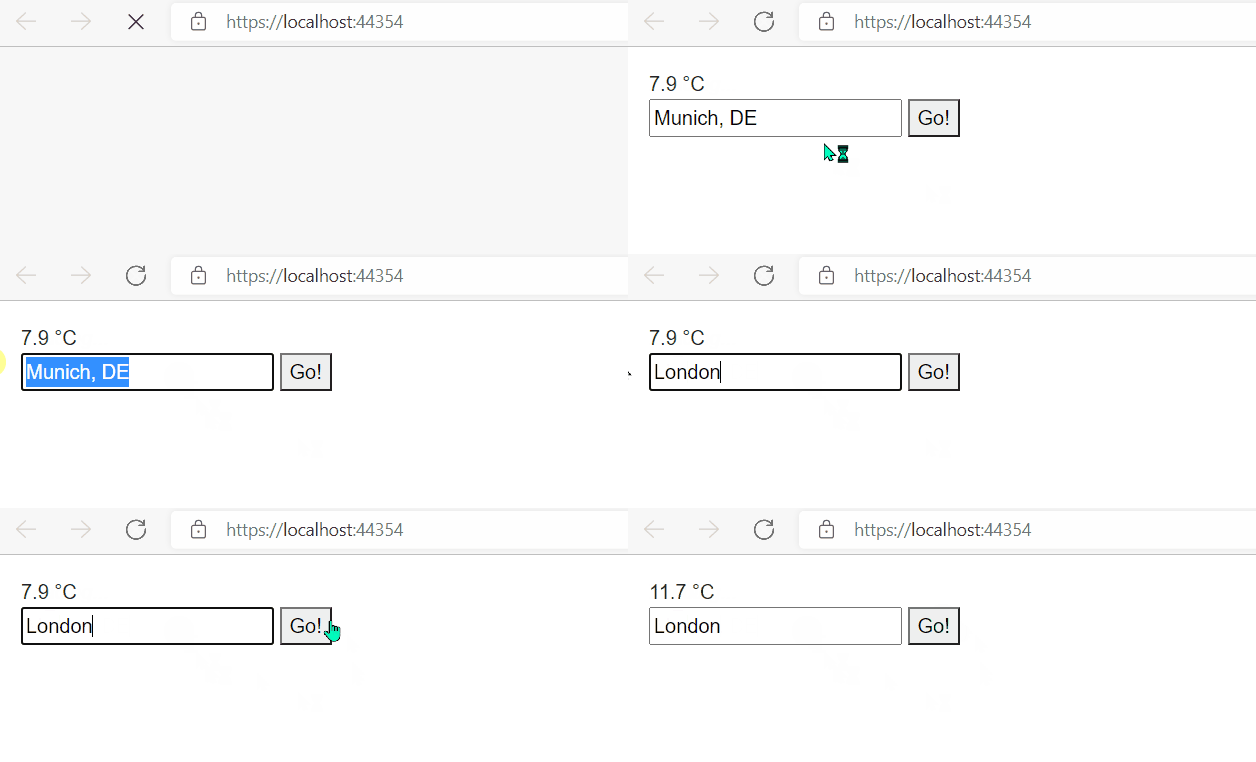
Returning from the under the hoods magic, if we want end users to be able to change the city and magically see the weather, we will need the following:
- A property where we can use to read/write the city name,
likepublic string CurrentCity { get; set; } = "Munich, DE"; - An input field, bound to that property,
like<input ... value="@CurrentCity" @oninput="@((e) => { CurrentCity = (string)e.Value;})" /> - And a button to retrieve the weather data on demand (by executing an onlclick event),
like<button class="btn btn-info" type="button" @onclick="OnSearchNewCity">Go!</button>
Putting all these together, no surprises, we end up with the following piece of code:
@using Blazor.WeatherWidget.Services;
@using Blazor.WeatherWidget.Models;

@inject IWeatherService service;

@if (result == null)
{
    <p><em>Loading...</em></p>
}
else
{
    <div>@Math.Round(result.Main.Temperature, 1) °C</div>
    <!-- Add an input that is bound to the new property CurrentCity -->
    <input value="@CurrentCity" @oninput="@((e) => { CurrentCity = (string)e.Value;})">
    <!-- Add a button that onclick runs an event to retrieve data for the typed city -->
    <button class="btn btn-info" type="button" @onclick="OnSearchNewCity">Go!</button>
}


@code {

    private Root result;
    public string CurrentCity { get; set; } = "Munich, DE";

    protected override async Task OnInitializedAsync()
    {
        result = await service.Get(CurrentCity, "XXXXXXXXXXXXXXXXXXXXXXX");
    }
    protected async Task OnSearchNewCity()
    {
        //I know, its the same as OnInitializedAsync, but let's move on for now
        result = await service.Get(CurrentCity, "XXXXXXXXXXXXXXXXXXXXXXX");
    }
}
Which will give us the following result:
Step 7. Expose more features
What we have up to here is a nice component built specifically for our app and nothing more, because any component that wishes a general availability future should offer parameterization to the full extend! Having said that, a potential developer that wishes to use our component will have to get it as an assembly (or even better as Nuget package), add a using and then add the <WeatherWidget /> tag wherever they wish to present weather to their end users. But they get nothing more than a stiff, unattracted piece of HTML. There is no way to set the default city, the template is hardcoded, the buttons, everything…
Let’s attack one by one these issues:
Step 7.1 Parameterize the default city
There is a very easy way to do that with component parameters. Component parameters pass data to components and are defined using public C# properties on the component class with the [Parameter] attribute.
Because it’s that easy, corrections are minimal. We just need to add the [Parameter] in line 23 in the sample above and nothing else, since the property is already public:
public string CurrentCity { get; set; } = "Munich, DE";
to:
[Parameter]
 public string CurrentCity { get; set; } = "Munich, DE";
This will give us the additional feature of allowing the consumer to set the default city:
<WeatherWidget CurrentCity="London, UK"/>
And with just a bit of effort which is not included here, we can rename the property to something more appropriate, like DefaultCity.
Providing initial values for component parameters is supported, but don’t create a component that writes to its own parameters after the component is rendered for the first time. For more information, see Overwritten parameters.
Step 7.2 Allowing user defined templates
Allowing user-defined templates implies that we need to store the current template in a variable (as the default one) and allow the component consumer to potentially set their own template, apparently in a public property decorated with the [Parameter] attribute. Once we have that, it’s only about choosing which one to render; if the consumer defines one use that, else use ours. The type that can take accept the template content is the RenderFragment, a delegate that is contained in the Microsoft.AspNetCore.Components namespace and represents a segment of UI content that writes the content to a Rendering.RenderTreeBuilder.
Going from theory to practice, let’s create a local variable of type RenderFragment and expose a parameter of type RenderFragment<TValue> that the component consumer can use to define their own template. The TValue in this generic type will be the serialized type of the JSON returned from our weather service (named Root for us), which will allow the consumer to access all properties of Root as @context.
Following this, here is our component with all the new cool stuff:
@using Blazor.WeatherWidget.Services;
@using Blazor.WeatherWidget.Models;

@inject IWeatherService service;
    <!-- That´s our default tempate -->

@{
    RenderFragment defaultTemplate =
    @<div>
        @if (result != null)
        {
            <div>@Math.Round(result.Main.Temperature, 1) °C</div>
            <!-- Add an input that is bound to the new property CurrentCity -->
            <input value="@CurrentCity" @oninput="@((e) => { CurrentCity = (string)e.Value; })">
            <!-- Add a button that onclick runs an event to retrieve data for the typed city -->
            <button class="btn btn-info" type="button" @onclick="OnSearchNewCity">Go!</button>
        }
    </div>; <!-- Mind the semicolon here, it marks the end of our template! -->
}

@if (result == null)
{
    //We can define a new template for loading too!
    <p><em>Loading...</em></p>
}
else
{
    //If dev didnt define one, lets use ours
    if (CustomTemplate == null)
    {
        @defaultTemplate
    }
    else
    {
        @CustomTemplate(result);
    }
}


@code {
    private Root result;

    //A public parameter, exactly as we did with the CurrentCity parameter
    [Parameter]
    public RenderFragment<Root> CustomTemplate { get; set; }

    [Parameter]
    public string CurrentCity { get; set; } = "Munich, DE";

    protected override async Task OnInitializedAsync()
    {
        result = await service.Get(CurrentCity, "XXXXXXXXXXXXXXXXXXXXXXX");
    }
    protected async Task OnSearchNewCity()
    {
        //I know, its the same as OnInitializedAsync, but let's move on for now
        result = await service.Get(CurrentCity, "XXXXXXXXXXXXXXXXXXXXXXX");
    }
}
And as a result consumers can define their own template like this:
@page "/"
@using Blazor.WeatherWidget

<!-- Showing weather with the default template -->
<WeatherWidget CurrentCity="London, UK" />

<!-- Using a custom template -->
<WeatherWidget CurrentCity="Munich, DE">
    <CustomTemplate>
       That's my weather in Munich: <strong>@Math.Round(context.Main.Temperature, 1) °C</strong>
    </CustomTemplate>
</WeatherWidget>
Step 7.3 Allow binding of the CurrentCity to enable custom user-defined form fields
Last but not least, giving the consumers of our component the ability to allow their end-users to change the city on demand. This can be achieved by allowing a two-way binding directly to the CurrentCity parameter, and monitor the value changes of it with an event called OnParametersSetAsync().
This scenario is called a chained bind because multiple levels of binding occur simultaneously. Component parameters permit binding properties of a parent component with @bind-{PROPERTY} syntax, where the {PROPERTY} placeholder is the property to bind. In the component on the other hand, by convention, the EventCallback<TValue> for the parameter must be named as the component parameter name with a “Changed” suffix. The naming syntax is {PARAMETER NAME}Changed, where the {PARAMETER NAME} placeholder is the parameter name.
The quite complicated paragraph above can be illustrated with two lines of code, first for the component and second for the consumer:
[Parameter] public EventCallback<string&rt; CurrentCityChanged { get; set; }
<WeatherWidget @bind-CurrentCity="@myCityBinding" />
Mind that the name of the parameter is CurrentCity and the names must include that. Full of conventions but not too complicated, I hope!
Once we have that, we need a method to be invoked when the component has received parameters from its parent in the rendered tree and the incoming values have been assigned to properties, which is the OnParametersSetAsync() event.
If you don’t already know about ASP.NET Core Razor component lifecycle, there is a well written guide in Microsoft Docs
Learn more about ASP.NET Core Blazor data binding and ASP.NET Core Blazor event handling
The benefit of OnParametersSetAsync() is that it’s not only called when parameters change but also after the component is initialized in OnInitialized or OnInitializedAsync, which translates, let’s discard the OnInitializedAsync(); and by the way let’s also tidy up the solution a bit:
@using Blazor.WeatherWidget.Services;
@using Blazor.WeatherWidget.Models;

@inject IWeatherService service;
<!-- That´s our default tempate -->

@{
    RenderFragment defaultTemplate =
    @<div>
        @if (result != null)
        {
            <div>@Math.Round(result.Main.Temperature, 1) °C</div>
            <!-- Add an input that is bound to the new property CurrentCity -->
            <input value="@CurrentCity" @oninput="@((e) => { CurrentCity = (string)e.Value; })">
            <!-- Add a button that onclick runs an event to retrieve data for the typed city -->
            <button class="btn btn-info" type="button" @onclick="OnSearchNewCity">Go!</button>
        }
    </div>; <!-- Mind the semicolon here, it marks the end of our template! -->
}

@if (result == null)
{
    //We can define a new template for loading too!
    <p><em>Loading...</em></p>
}
else
{
    //If dev didnt define one, lets use ours
    if (CustomTemplate == null)
    {
        @defaultTemplate
    }
    else
    {
        @CustomTemplate(result);
    }
}

@code {
    private Root result;

    //A public parameter, exactly as we did with the CurrentCity parameter
    [Parameter]
    public RenderFragment<Root> CustomTemplate { get; set; }

    [Parameter]
    public string CurrentCity { get; set; } = "Munich, DE";

    [Parameter]
    //This provides support for two-way binding from parent component e.g. <WeatherWidget @bind-CurrentCity="@currentCity" />
    public EventCallback<string> CurrentCityChanged { get; set; }

    protected override async Task OnParametersSetAsync()
    {
        await PopulateWeatherDataAsync();
    }

    protected async Task OnSearchNewCity()
    {
        await PopulateWeatherDataAsync();
    }

    private async Task PopulateWeatherDataAsync()
    {
        result = await service.Get(CurrentCity, "XXXXXXXXXXXXXXXXXXXXXXX");
    }
}
At the end, the solution on the consumer side can look like the following:
@page "/"
@using Blazor.WeatherWidget

<!-- Showing weather with the default template -->
<WeatherWidget CurrentCity="London, UK" />

<br /><br /><br />

<!-- Using a custom template -->
<WeatherWidget @bind-CurrentCity="@myCityBinding">
    <CustomTemplate>
        That´s the temperature  in @myCityBinding: <strong>@Math.Round(context.Main.Temperature, 1) °C</strong>
        <br />
        <input value="@myCity" @oninput="@((e) => { myCity = (string)e.Value; })">
        <button class="btn btn-info" type="button" @onclick="OnSearchNewCity">Search for a new temperature!</button>
    </CustomTemplate>
</WeatherWidget>


@code {

    private string myCity = "Tokyo";
    private string myCityBinding = "Tokyo";

    protected void OnSearchNewCity()
    {
        myCityBinding = myCity;
    }
}
We are done!
A long way after we started, a post with certainly many steps but one that opens up a new possibility for all community nerds out there like me: You can now write and publish your own Blazor Component!
Blazor is here to stay because enables sharing code written in C# between the browser and the server, which means type definitions and data structures can be shared and verified anywhere in the stack. Less code means less bugs which brings security and confidence within a full-stack team.
Code Samples
You can find the samples included in the post as gists here. Additionally, find the code of a fully working weather component in my github account: https://github.com/georgekosmidis/Blazor.WeatherWidget/ and a live sample here: https://blazor-weatherwidget.azurewebsites.net/. Additionally, I also made a Nuget Package out of it


