

IdentityServer4, ASP.NET Core API and a client with username/password
This is an end-to-end guide on how to quickly setup IdentityServer4, use it in your ASP.NET Core API for authentication, and finally login to your API from a client by asking a user for her/his username and password. It is divided in three parts that describe respectively the configuration of each one of the following three systems:
- IdentityServer4
Contains instructions on how to setup and configure a token service based on IdentityServer4, that follows the quick-start guides, keeping only the absolutely minimum requirements for this tutorial - ASP.NET Core API
An API configured to use IdentityServer4 as a middleware that adds the spec compliant OpenID Connect and OAuth 2.0 endpoints - Client (API Consumer)
For this post, just a Console Application that consumes a protected resource from the API
Make authenticated requests to IdentityServer4 protected resources, using the IdentityServer4.Contrib.HttpClientService nuget package. It’s open source on github, just follow these Getting Started instructions or take a look at at sample!
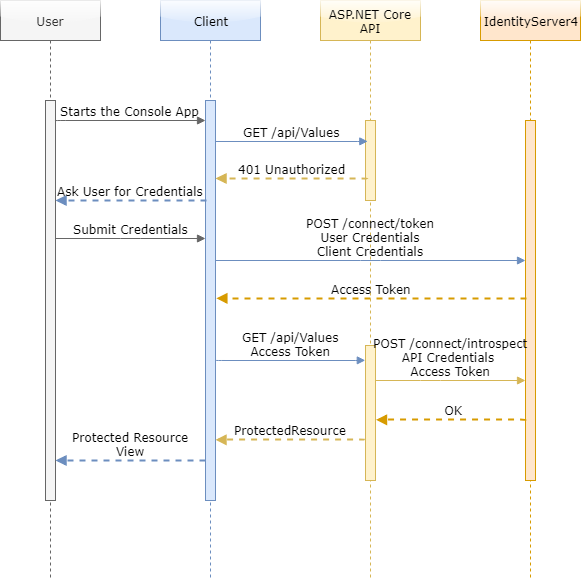
These systems interact with each other in a way outside the complete control of a user creating a triangle of communication that prevents man-in-the-middle attacks. To get a general idea about how the information flows between the three systems, study the following sequence flow:

IdentityServer4
The Identity Server has three major entities that we have to setup for this tutorial to work, the ApiResource, the Client and a TestUser. All of them will need a minimum configuration, but before we start it is useful to have the following in mind:
- The Console Application will play the role of the
Client. It uses aClientId& aSecretplus the username and the password of a User to get the token. - The ASP.NET Core API will of course be the
ApiResource. It uses anApiName&Secretplus the access token, to getClaimsback. - A
Clientmust have anApiResourcein theirAllowedScopeslist in order for the Idenity Server to allow access
Setting up the project
There is an easy way to create a new project for the IdentityServer4! All we need is to create the new project based on IdentityServer4 templates, and in order to do that, we must install the templates and create a new project by following these steps:
- Open PowerShell and navigate to a directory that you want your project to be created
- Type
dotnet new -i IdentityServer4.Templatesand hit enter - Type
dotnet new is4empty -n IdentityServerand hit enter again
And that’s it! You can now double click the IdentityServer.csproj created, and use Microsoft Visual Studio (or Visual Studio Code) to explore the project. Since there aren’t many files you will easily notice a Config.cs file (it keeps all the initial hard-coded configuration) with 3 IEnumerables: IdentityResources, ApiResources and Clients. For this tutorial we only care about ApiResources and Clients plus, we will also add a fourth method that returns TestUsers (all methods in Config.cs are called from StartUp.cs during service configuration, and we will follow this “pattern” for the TestUsers method).
Setting up the ApiResource
A word of notice before we start: The models of the Identity Server do not always include just properties as someone would expect by a namespace
IdentityServer4.Modelsincluded in an assembly namedIdentityServer4.Storage. Some of those models have constructors with a bit of logic in them (e.g. ApiResource.cs), so before you use them check them. And yes, “some storage models having some constructors with some arguments that you must use instead of the properties” is not cool at all, I spend quite some time searching which models have constructors and with what arguments.
Adding an ApiResource is quite straight forward (that is, if you read the notice above): Just use the constructor to pass the name and assign a Secret to the ApiSecrets property:
public static IEnumerable<ApiResource> GetApis()
{
    return new List<ApiResource>
    {
        new ApiResource( "ApiName" )
        {
            ApiSecrets = {
                new Secret( "secret_for_the_api".Sha256() )
            }
        }
    };
}
Behind the scenes, that constructor adds the “ApiName” as an AllowedScope for that ApiResource
Setting up the Client
Clients can be a little more complex though! Besides the ClientId and a Secret, we have to set the AllowedGrantTypes and the AllowedScopes properties:
public static IEnumerable<Client> GetClients()
{
    return new List<Client>
    {
        new Client
        {
            ClientId = "ConsoleApp_ClientId",
            ClientSecrets = {
                new Secret( "secret_for_the_consoleapp".Sha256() )
            },
            //http://docs.identityserver.io/en/latest/topics/grant_types.html
            AllowedGrantTypes = GrantTypes.ResourceOwnerPassword,
            AllowedScopes = {
                "ApiName"
            },
        }
    };
}
GrantTypes.ResourceOwnerPassword simply means allow a client to send username and password to the token service and get an access token back that represents that user. Also note that we added the API name as an allowed scope of the client ...AllowedScopes = { "ApiName" }... (simply as string, no type safety here). Apparently, the Clients don’t need to add themselves in their own AllowedScope, that is why there is no construction here.
There are two types of access tokens,
JWTandReference. Default isJWT, a self-contained access token which is essentially a protected data structure with claims and an expiration. Read more about pros and cons of each solution here.
Setting up a TestUser
Setting up a user store is probably a blog post on its own (and it might be in the future), so for this tutorial we will only add test users to the Identity Server. To do so, we will need to use the .AddTestUsers() extension method and pass a list of test users, which can be returned by a static method in the Config.cs file like so:
public static List<TestUser> GetTestUsers()
{
    return new List<TestUser>()
    {
        new TestUser
        {
            SubjectId = "1",
            Username = "demo",
            Password = "demo".Sha256()
        }
    };
}
Sort of self-explanatory I think! Keep in mind this is the bare minimum to pass the authentication. In a real life scenario you will need claims that you can add to the Claims property of the TestUser like this: Claims = { new Claim(JwtClaimTypes.Role, "SomeRole") }. Finally, as the rest of the static methods in the Config.cs file, make the call to add the users in the ConfigureServices method of the StartUp.cs:
public void ConfigureServices(IServiceCollection services)
{
        //...
        var builder = services.AddIdentityServer()
        //...
        .AddTestUsers(Config.GetTestUsers());
        //...
}
Important!
ApiSecrets,ClientSecretsandTestUser.Passwordshould be real secrets, e.g. random strings!
ASP.NET Core API
Enabling authentication capabilities to your API requires the addition and configuration of the Authentication middleware. After that, we can add the AuthorizeFilter either while configuring the container or use the [Authorize] decoration attribute that is just a comfortable wrapper of the AuthorizeFilter.
Three straight forward steps are needed to complete this:
Add the necessary nuget packages
Just right click on your Dependencies and add the following two nuget packages:
- IdentityServer4
(https://github.com/IdentityServer/IdentityServer4) - IdentityServer4.AccessTokenValidation
(https://github.com/IdentityServer/IdentityServer4.AccessTokenValidation)
Add the necessary services to the container
First of all, I like Authentication by default. I find it unsafe to have to remember to add the [Authorize] attribute to each Action. I prefer to explicitly allow access for the actions that I am absolutely certain that need to be available for everyone with the [AllowAnonymous] decoration attribute. Having stated this, we will need to add the AuthorizeFilter to all actions using the FilterCollection:
public void ConfigureServices(IServiceCollection services)
{
    //...
    services.AddMvcCore(options =>
           {
               options.Filters.Add(new AuthorizeFilter());
           });
    //...
}
In a role-based or claims-based environment you can still have authentication by default and decorate your actions with the [Authorize] attribute. MVC will then add a second
AuthorizeFilterto its filter pipeline, with a drawback of course, the one of double execution. To minimise (or vanish) this negative effect either don’t use authentication by default, or choose JWT access tokens because once an API has learned about the key material, it can validate self-contained tokens without needing to communicate with the issuer.
Immediately after the AddMvcCore add the authorization service to the services collection with AddAuthorization(). You can also use the AuthorizationOptions to configure Claims-based or Policy-based authorization.
public void ConfigureServices(IServiceCollection services)
{
    //...
    services.AddMvcCore(options =>
            {
               options.Filters.Add(new AuthorizeFilter());
            })
            .AddJsonFormatters()
            .AddAuthorization();
    //...
}
Add AddApiExplorer() at the end if you are using Swagger. Read more here…
After this basic setup, you have to configure the authentication. You do that with the AddAuthentication method. Since we will be using a OAuth 2.0 Bearer Token, we also need to pass that to the method. Following this, we add the identity server authentication configuration with the .AddIdentityServerAuthentication() method, in which we have to set the URL of the IdentityServer, the ApiName and of course the secret:
public void ConfigureServices(IServiceCollection services)
{
    //...
    services.AddAuthentication(IdentityServerAuthenticationDefaults.AuthenticationScheme)
            .AddIdentityServerAuthentication(options =>
            {
                options.Authority = "http://localhost:5000";//IdentityServer URL
                options.RequireHttpsMetadata = false;       //False for local addresses, true ofcourse for live scenarios
                options.ApiName = "ApiName";
                options.ApiSecret = "secret_for_the_api";
            });
    //...
}
It’s a good idea to use caching and avoid asking the IdentityServer each and every time. Do that with the EnableCaching and CacheDuration options.
Configure the HTTP request pipeline
Easiest step! Just add the AuthenticationMiddleware in the pipeline but be careful where! It needs to be before all other middlewares, that is first in the pipeline:
public void Configure(IApplicationBuilder app, IHostingEnvironment env, ILoggerFactory loggerFactory)
{
    app.UseAuthentication();
    //...
}
Client (API Consumer)
The Authorization: <type> <credentials> pattern was introduced by the W3C in HTTP 1.0, and this is what we need to follow regardless the client. That means, that although for this tutorial though it will just be a .NET Core Console Application, the core mechanism of how a client gets authenticated with a username and password remains the same.
The complete code, the one that also handles the 401 response described in the sequence diagram, can be found on my github account.
Add the necessary nuget packages
Just right click on your Dependencies and add the following nuget package:
- IdentityModel
(https://github.com/IdentityModel/IdentityModel2)
Get the token from the Identity Server
There are quite a few things to setup in order to make the call and get a token back. Besides the address of the token service (which is in the form of https://localhost:5000/connect/token, we will need Client’s and User credentials, and the GrandType, which for us is “password”:
var identityServerResponse = await httpClient.RequestPasswordTokenAsync(new PasswordTokenRequest
{
    Address = "http://localhost:5000/connect/token",
    GrantType = "password",

    ClientId = "ConsoleApp_ClientId",
    ClientSecret = "secret_for_the_consoleapp",
    Scope = "ApiName",

    UserName = username,
    Password = password.ToSha256()
});
The Password grant type (GrantType = "password") is used by first-party clients to exchange a user’s credentials for an access token and thus, it should not be used by third-party clients. It simply means, exchange the user’s username and password with an access token.
Add the authorization header
After a successful authentication we should have the AccessToken in the response. We can now use that and add it as a AuthenticationHeader in the DefaultRequestHeaders:
if (!identityServerResponse.IsError){
    var client = new HttpClient();
    client.DefaultRequestHeaders.Authorization = new AuthenticationHeaderValue("Bearer", identityServerResponse.AccessToken);
    var apiResponse = await client.GetAsync("https://localhost:44328/api/values");
}
Code Sample
The entire sample, constisting of a setup of the IdentityServer4, a ASP.NET Core API and a Console Application acting as a first-party client, can be found on my GitHub account under the repository https://github.com/georgekosmidis/IdentityServer4.SetupSample
Make authenticated requests to IdentityServer4 protected resources, using the IdentityServer4.Contrib.HttpClientService nuget package. It’s open source on github, just follow these Getting Started instructions or take a look at at sample!